")
After today, the AdaptiveWork Periodic Project Report (PPR) + Document Publisher will be much easier for you to use!
Imagine, a “one-click” status report inside of AdaptiveWork that can save you a huge amount of time! This article will teach you tips and tricks to create advanced status reporting automaton on the AdaptiveWork Periodic Project Report (PPR).
What is the PPR?
The Periodic Project Report (PPR) found in AdaptiveWork, provides Project Managers the ability to distribute status reports in either .doc or .PDF format!
Document Publisher
Document Publisher lets you dynamically create reports in the Microsoft Word (.docx), PowerPoint (.pptx and .pptm) file formats based on AdaptiveWork data. As a one time set up, you need to create and upload a file template with field mappings, and desired layout and branding. With the Document Publisher, you can create powerful branded reports, executive memos, presentations populated with AdaptiveWork data. You can also output Microsoft Word document into a PDF file which can be emailed or downloaded.
Periodic Project Report (PPR)
Generate a Project Report with basic project information, roadmap, details on milestones, tasks (completed, active and tasks at risk or off/track), risks, requests, issues, bugs and timesheet reports.
Document Publisher vs Slide Publisher
AdaptiveWork users may be more familiar with Carizen’s Slide Publisher application, which is similar to Document Publisher in that it is an easy way to merge project data, timeline graphics and even report charts into external documents. But, there are a couple key differences between Slide Publisher and Document Publisher.
A key difference is that there is no option to load different PPT templates and have them selected at run time for Slide Publisher, though multiple Document Publisher templates can be loaded and then selected at run time.
Some additional differences include:
| Slide Publisher | Document Publisher | |
| Exports data to… | MS Powerpoint | MS Word or PDF |
| Exports data from… | Projects, Programs, Custom Objects | Projects, Cases |
| User Experience… | Easy copy/paste tags, easy for most users | Less intuitive use of merge tags, not for the typical user |
AdaptiveWork Document Publisher and the Periodic Project Report are greats tool for exporting AdaptiveWork to Word/PDF documents for distribution and can provide the foundation to a document creation system that is integrated with your PPM. Some example uses may include:
- Change requests
- Purchase orders
- Invoices
- Status reports (using the PPR)
- Portfolio and financial reports
- Or any other document based on data in AdaptiveWork
The links above provide base level documentation on how to use Document Publisher and PPR. Recently I had the opportunity to solve some requests for extracting data for “Custom Fields”, “linked” objects, and “related” items which require more sophisticated use of Document Publisher’s merge tags. In this post I will share an example of each of these more sophisticated configurations. Be sure to review the AdaptiveWork documentation linked above first to gain a base level understanding of how to run the custom macros and manage the table configuration & formatting.
The PPR report is based on AdaptiveWork’s Document Publisher properties. The PPR installation from the Apps Marketplace provides a template that will be stored as a file within the AdaptiveWork Instance. Because of this, the file respects the accessibility rules of certain members in the group. For group members to access the correct PPR report, it must be added as a related item to the associated group.
Standard & Custom fields
Referencing standard or custom fields requires a single area selection for the field formula to reside in. The below example will grab a custom field with the API name of “C_Otherinformation” from the Request Work item and place it in the selected area.
Example Formula: { !field=EnhancementRequest.C_OtherInformation }

Related Items
Referencing related items is a bit more complicated to configure. This type of reference requires two or more fields and associated formulas which will bring in a row for each item that is related.
Note the highlighted section and the corresponding formula below, this is the first identifier for the related item. It outlines the related item in the Project work item, in this case, Decisions. This formula designates the related item and the row creation.
Example Formula:
Related Item identifier: [ !field=Project.R_Decisions !relationfield=R_Decisions !orderby=R_Decisions.Title !orderdesc=False !totalrow=False ]
-

Related Item identifier – Mapping the Related Item Decisions
The second identifier shown below specifies the field(s) in the related item to be displayed, in this example Title and State of the decisions are being configured. Additional columns can be added with corresponding formulas to bring in additional fields.
Example Formulas:
Related Item Field identifier: { !field= R_Decisions.Title }
Related Item Field identifier: { !field=R_Decisions.State.Name }
-

Related Item Field identifier – Mapping the Title field for related item Decisions.
-

Related Item Field identifier – Mapping the State field for related item Decisions.
Linked Objects
Referencing Linked items is similar to Related items, the primary difference is determining the name of the Link. A quick search in AdaptiveWork’s configuration will yield the information that is required. For this example the Link is Project Customer Link, in order to reference it, you need to use the name “CustomerLink”.
-
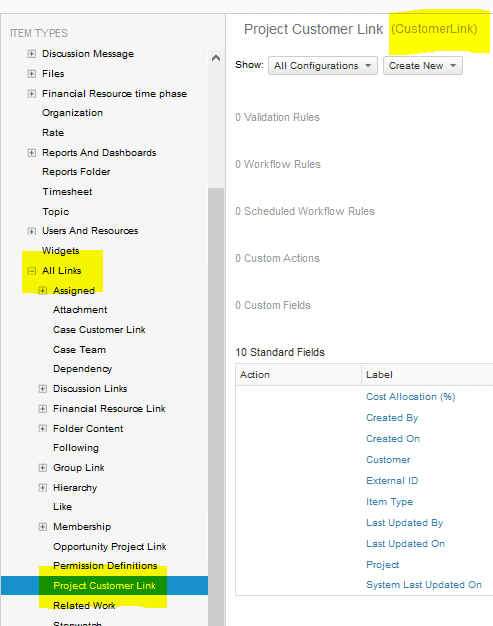
Finding the Link name to User for DP or PPR
This type of reference requires two or more fields and associated formulas and will bring in a row for each item that is linked. Additional columns can be added with corresponding formulas to bring in additional fields.
Example Formulas:
Link Identifier: [ !field=Project.CustomerLink !relationfield=Entity !totalrow=False ]
Linked Field Identifier: { !field=CustomerLink.Customer.Name }
-

Link Identifier – Mapping Project Customer Link
-

Link Field Identifier – Mapping the Customer Name
Next Steps
Contact Us to find out more about our Project Management Services, please email us at PPManswers@KolmeGroup.com
Be sure to follow us on Twitter, LinkedIn and YouTube and use #KolmeGroup on your shared posts!